
Series
Hello! In this post, we'll explain how to composite a photo taken with a camera onto the transparent part of a background image. We'll implement a method to resize the captured photo to fit within the transparent area of the background while maintaining its aspect ratio, and position it centrally.
In the previous article, we implemented the photo capture and countdown features. This time, we'll locate the transparent part of the background image and accurately composite the captured image onto it.
1. Required Packages and Permission Settings
Here are the packages and permission settings we'll use in this post:
1.1 Installing the OpenCvSharp4 Package
First, to process images using the OpenCVSharp library, we'll install the OpenCvSharp4.runtime.win and OpenCvSharp4.Extensions packages. This allows us to perform image composition tasks using OpenCVSharp's powerful image processing capabilities.

1.
Search for and install OpenCvSharp4.runtime.win and OpenCvSharp4.Extensions in the NuGet Package Manager.
2.
You can now add the OpenCVSharp library to your project and proceed with image processing tasks.
1.2 Adding Picture Library Permission
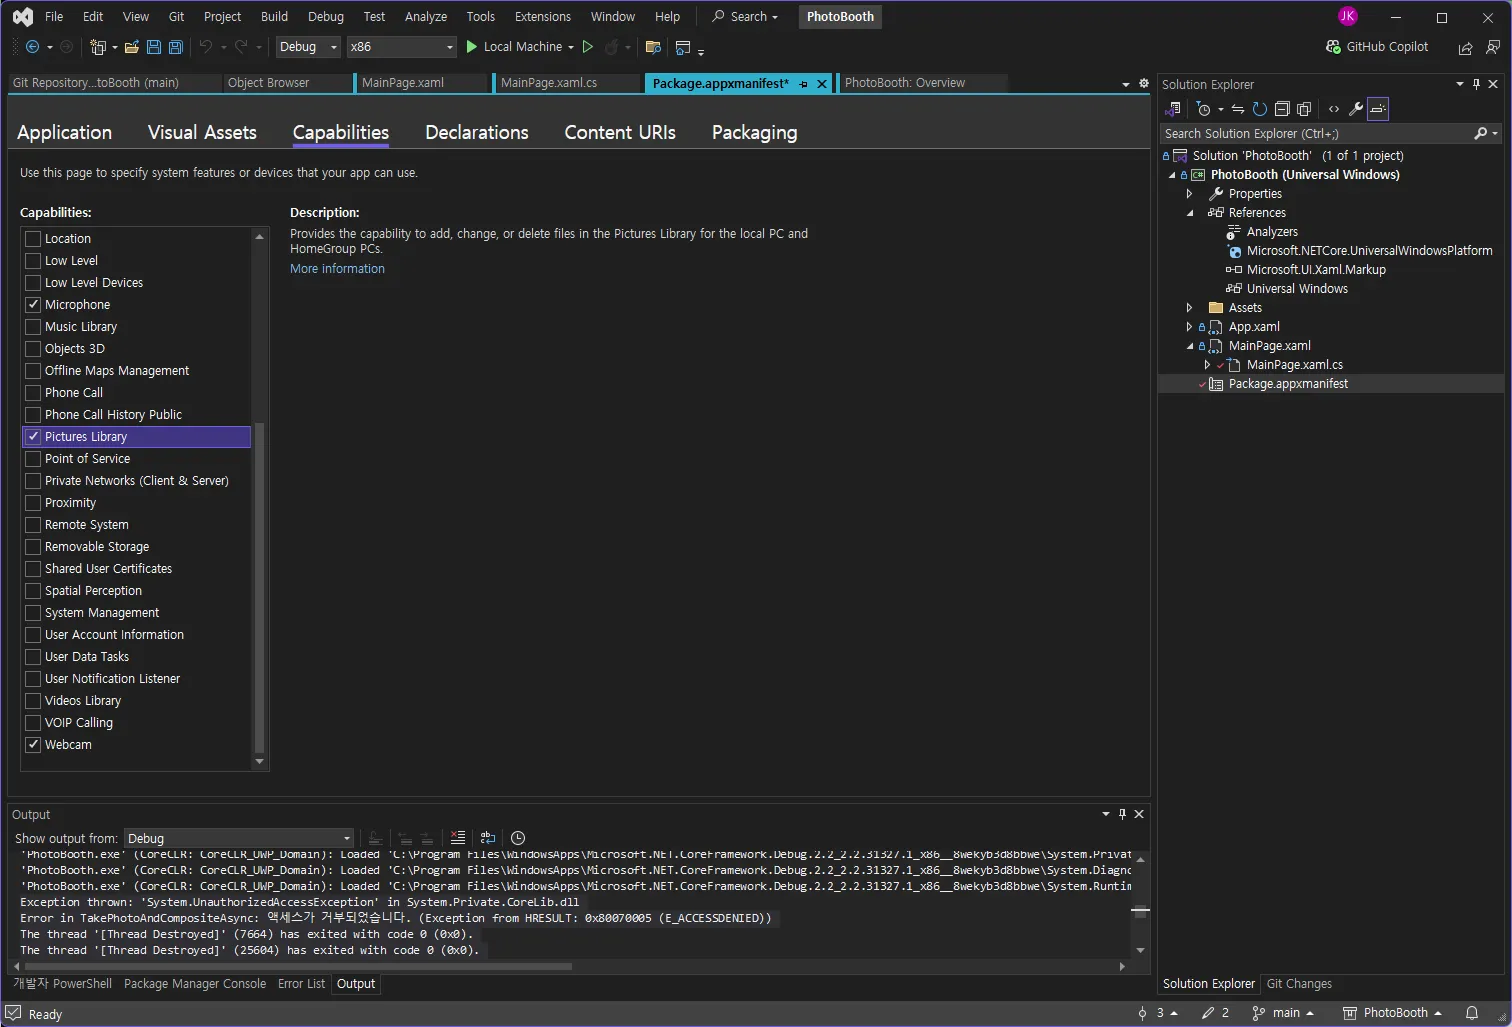
To load background images, you need to be able to access files from the Picture Library. Therefore, you need to add Picture Library access permission to the app's Package.appxmanifest file.
1.
Open the Package.appxmanifest file and select the Capabilities tab.
2.
Check "Pictures Library" to allow the app to access the user's photo library.
<Capabilities>
<Capability Name="internetClient" />
<uap:Capability Name="picturesLibrary" />
</Capabilities>
XML
복사
2. Complete Code
2.1 Flow of Combining Background Image and Captured Photo
The essence of this post is resizing the captured image to fit the transparent part of the background image while maintaining its aspect ratio, and positioning it centrally. After that, we composite the photo onto the background image to output as a single image.
Complete Code
using OpenCvSharp;
using OpenCvSharp.Extensions;
using System;
using System.Collections.Generic;
using System.IO;
using System.Runtime.InteropServices;
using System.Runtime.InteropServices.WindowsRuntime;
using System.Threading.Tasks;
using Windows.Media.Capture;
using Windows.Storage;
using Windows.UI.Xaml;
using Windows.UI.Xaml.Controls;
using Windows.UI.Xaml.Media.Imaging;
namespace PhotoBooth
{
public sealed partial class MainPage : Page
{
private MediaCapture _mediaCapture;
private bool _isPreviewing = true;
public MainPage()
{
this.InitializeComponent();
EnterFullScreenMode();
InitializeCameraAsync();
}
private void EnterFullScreenMode()
{
var view = Windows.UI.ViewManagement.ApplicationView.GetForCurrentView();
view.TryEnterFullScreenMode();
Windows.UI.ViewManagement.ApplicationView.PreferredLaunchWindowingMode = Windows.UI.ViewManagement.ApplicationViewWindowingMode.FullScreen;
}
private async void InitializeCameraAsync()
{
_mediaCapture = new MediaCapture();
await _mediaCapture.InitializeAsync();
CameraPreview.Source = _mediaCapture;
await _mediaCapture.StartPreviewAsync();
}
private async void CameraPreview_Tapped(object sender, Windows.UI.Xaml.Input.TappedRoutedEventArgs e)
{
if (_isPreviewing)
{
await StartCountdownAndTakePhoto();
}
}
private async Task StartCountdownAndTakePhoto()
{
try
{
CountdownText.Visibility = Visibility.Visible;
for (int i = 2; i > 0; i--)
{
CountdownText.Text = i.ToString();
await Task.Delay(1000);
}
CountdownText.Visibility = Visibility.Collapsed;
await TakePhotoAndCompositeWithOpenCVAsync();
}
catch (Exception ex)
{
System.Diagnostics.Debug.WriteLine($"An error occurred in StartCountdownAndTakePhoto: {ex.Message}");
}
}
public static Mat WriteableBitmapToMat(WriteableBitmap wb)
{
// Get pixel data from WriteableBitmap as an array
using (var stream = wb.PixelBuffer.AsStream())
{
byte[] pixels = new byte[stream.Length];
stream.Read(pixels, 0, pixels.Length);
// Create OpenCV Mat object (BGRA format)
Mat mat = new Mat(wb.PixelHeight, wb.PixelWidth, MatType.CV_8UC4); // 8UC4: 8-bit unsigned 4-channel image (BGRA)
// Copy WriteableBitmap's pixel data to Mat's memory buffer
Marshal.Copy(pixels, 0, mat.Data, pixels.Length);
return mat;
}
}
public static WriteableBitmap MatToWriteableBitmap(Mat mat)
{
WriteableBitmap wb = new WriteableBitmap(mat.Width, mat.Height);
using (Stream stream = wb.PixelBuffer.AsStream())
{
byte[] pixels = new byte[mat.Width * mat.Height * mat.ElemSize()];
Marshal.Copy(mat.Data, pixels, 0, pixels.Length);
stream.Write(pixels, 0, pixels.Length);
}
return wb;
}
private async Task<Mat> LoadAndResizeBackgroundImageAsync(StorageFile backgroundFile, int targetWidth, int targetHeight)
{
// Load background image
Mat backgroundMat;
using (Stream backgroundStream = await backgroundFile.OpenStreamForReadAsync())
{
backgroundMat = Mat.FromStream(backgroundStream, ImreadModes.Unchanged); // Unchanged: Preserve transparency information
}
// Resize background image to target size
if (backgroundMat.Width > targetWidth || backgroundMat.Height > targetHeight)
{
Cv2.Resize(backgroundMat, backgroundMat, new OpenCvSharp.Size(targetWidth, targetHeight));
}
return backgroundMat;
}
private async Task TakePhotoAndCompositeWithOpenCVAsync()
{
try
{
// Take photo
var renderTargetBitmap = new RenderTargetBitmap();
await renderTargetBitmap.RenderAsync(CameraPreview);
var pixelBuffer = await renderTargetBitmap.GetPixelsAsync();
var capturedBitmap = new WriteableBitmap(renderTargetBitmap.PixelWidth, renderTargetBitmap.PixelHeight);
using (var stream = capturedBitmap.PixelBuffer.AsStream())
{
await stream.WriteAsync(pixelBuffer.ToArray(), 0, (int)pixelBuffer.Length);
}
// Convert WriteableBitmap to OpenCV Mat
Mat capturedMat = WriteableBitmapToMat(capturedBitmap);
// Load and resize background image from Pictures folder
var picturesFolder = await StorageFolder.GetFolderFromPathAsync(Environment.GetFolderPath(Environment.SpecialFolder.MyPictures));
var backgroundFile = await picturesFolder.GetFileAsync("background.png");
// Load and resize background image (e.g., resize to 1920x1080)
Mat backgroundMat = await LoadAndResizeBackgroundImageAsync(backgroundFile, 1920, 1080);
// Extract transparent areas as a mask (alpha channel value of 0)
Mat[] bgChannels = new Mat[4];
Cv2.Split(backgroundMat, out bgChannels);
Mat alphaChannel = bgChannels[3];
// Binarize transparent areas (white for alpha value 0, black for others)
Mat transparentMask = new Mat();
Cv2.Threshold(alphaChannel, transparentMask, 0, 255, ThresholdTypes.BinaryInv);
// Find transparent regions using connected component labeling
Mat labels = new Mat();
Mat stats = new Mat();
Mat centroids = new Mat();
int numLabels = Cv2.ConnectedComponentsWithStats(transparentMask, labels, stats, centroids);
// Find the largest transparent region
int largestLabel = 0;
int largestArea = 0;
for (int i = 1; i < numLabels; i++) // Exclude label 0 (background)
{
int area = stats.At<int>(i, 4); // Area is the 4th index
if (area > largestArea)
{
largestArea = area;
largestLabel = i;
}
}
// Get coordinates of the largest region
int x = stats.At<int>(largestLabel, 0); // Left (0th index)
int y = stats.At<int>(largestLabel, 1); // Top (1st index)
int width = stats.At<int>(largestLabel, 2); // Width (2nd index)
int height = stats.At<int>(largestLabel, 3); // Height (3rd index)
// Resize captured image to fit transparent area while maintaining aspect ratio
double aspectRatio = (double)capturedMat.Width / capturedMat.Height;
int newWidth, newHeight;
// Compare aspect ratios and resize accordingly
if ((double)width / height > aspectRatio)
{
newWidth = width;
newHeight = (int)(width / aspectRatio); // Fit to width
}
else
{
newHeight = height;
newWidth = (int)(aspectRatio * height); // Fit to height
}
// Resize captured image to the calculated size
Mat resizedCapturedMat = new Mat();
Cv2.Resize(capturedMat, resizedCapturedMat, new OpenCvSharp.Size(newWidth, newHeight));
// Calculate offsets for centering (crop overflowing parts)
int offsetX = x - (newWidth - width) / 2; // Move left by half of the overflow
int offsetY = y - (newHeight - height) / 2; // Move up by half of the overflow
// Center in transparent area
for (int i = 0; i < height; i++)
{
for (int j = 0; j < width; j++)
{
int srcY = i + (newHeight - height) / 2;
int srcX = j + (newWidth - width) / 2;
if (srcY >= 0 && srcY < resizedCapturedMat.Height && srcX >= 0 && srcX < resizedCapturedMat.Width)
{
Vec3b fgPixel = resizedCapturedMat.At<Vec3b>(srcY, srcX); // Pixel from captured image (BGR)
backgroundMat.Set(y + i, x + j, new Vec4b(fgPixel[0], fgPixel[1], fgPixel[2], 255)); // Composite onto background image
}
}
}
// Convert Mat to WriteableBitmap
WriteableBitmap resultBitmap = MatToWriteableBitmap(backgroundMat);
// Display composited image
CapturedImage.Source = resultBitmap;
CapturedImage.Visibility = Visibility.Visible;
CameraPreview.Visibility = Visibility.Collapsed;
// Show buttons
ButtonPanel.Opacity = 1;
// Release resources
capturedMat.Dispose();
resizedCapturedMat.Dispose();
backgroundMat.Dispose();
transparentMask.Dispose();
labels.Dispose();
stats.Dispose();
centroids.Dispose();
_isPreviewing = false;
}
catch (Exception ex)
{
System.Diagnostics.Debug.WriteLine($"An error occurred in TakePhotoAndCompositeWithOpenCVAsync: {ex.Message}");
}
}
private void RetakeButton_Click(object sender, RoutedEventArgs e)
{
ButtonPanel.Opacity = 0;
CapturedImage.Visibility = Visibility.Collapsed;
CameraPreview.Visibility = Visibility.Visible;
_isPreviewing = true;
}
private void PrintButton_Click(object sender, RoutedEventArgs e)
{
// Printing functionality to be implemented
}
}
}
C#
복사
3. Code Explanation
3.1 WriteableBitmapToMat and MatToWriteableBitmap
These functions handle the conversion between WriteableBitmap used in UWP and OpenCV's Mat. When processing images, we convert to OpenCV's Mat format, and when displaying in the UI, we convert back to WriteableBitmap.
3.2 Loading the Background Image and Detecting Transparent Areas
The LoadAndResizeBackgroundImageAsync function loads the background image and adjusts its size. Then, it extracts the alpha channel from the background image to generate a mask for the transparent parts, and works to find the largest area among the transparent regions.
3.3 Resizing and Centering the Captured Photo
The TakePhotoAndCompositeWithOpenCVAsync function is responsible for resizing the captured image to fit within the transparent area while maintaining its aspect ratio and centering it. It accurately places the resized image in the center of the transparent area and composites the image to fit that area.
4. Summary
In this post, we learned how to composite the captured image onto the transparent part of the background image. Using OpenCVSharp's powerful image processing capabilities, we implemented a method to resize while maintaining the aspect ratio and center the image. In the next post, we will complete the app by adding a printing function.
Next time:
Creating a UWP Desktop App in C# 5/5: Adding Printing Functionality to Complete the App
Read in other languages:
Support the Author:
If you enjoy my article, consider supporting me with a coffee!
Latest posts
Search